top of page
Search
  • Writer: Jenni
    Jenni
  • May 4, 2020
  • 3 min read

ree

Hello!


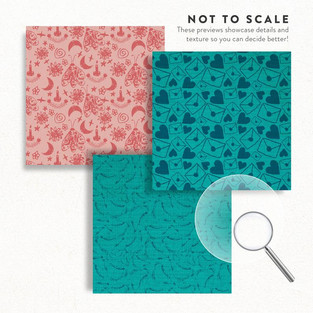
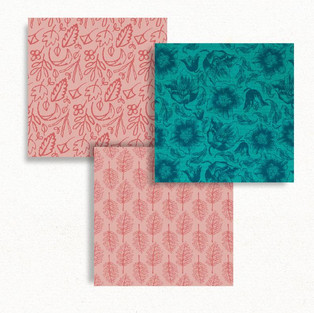
Today I am sharing a set of cards centered around the newest paper collection to Thoughtful Studio, Tessa's Summer Storms.


This collection is made up of dark teals and blues that pair perfectly with corally pinks and reds, which inspired me to create this set of floral greeting cards.


Along with the colors in this new collection, Tessa's Summer Storms also include many textured, botanical patterns that led me to using a floral centerpiece on each of my cards.


You can take a look at the collection below, as well as the bonus freebie included in the digital download.


ree


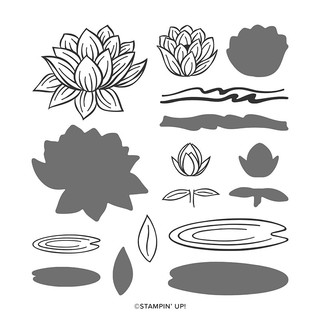
For my first card, I stamped out a group of flowers from Honey Bee Stamp's Everything Wonderful onto a piece of Strathmore watercolor paper with VersaFine Clair ink.


I then colored in the image with a water brush, using a variety of colors from my set of Karin Brushmarkers. I attempted to choose colors that corresponded with those found in the paper collection.


For the second card, I stamped out the same flower image onto two different coral/red patterned papers, as well as a piece of 80 lb. white card stock. Then I heat embossed them with gold detail embossing powder.


On one of the patterned papers, I just colored in the shading on the large flowers using copic markers. On the other patterned paper I did the same thing but only colored in the smaller flower images. For the leaves and berries, I used copics and filled in the images on the white card stock.


I then trimmed out each of the colored pieces and layered them on top of the colored image stamped on the white card stock. I used glue dots to secure the pieces and give a little dimension.


Once the images were colored, I trimmed them out and set them aside to start on the splattered backgrounds.


I smooshed some distress oxide inks in the colors spun sugar, worn lipstick, broken china, and peacock feathers onto my glass mat and spritzed them with water. I used a medium sized paint brush and splattered the inks onto a piece of 110 lb. card stock; I did the same with some Delicata Golden Glitz ink as well.


I trimmed down the splattered card stock to a 2 1/16" strip and ran the edges along the Delicata ink pad.


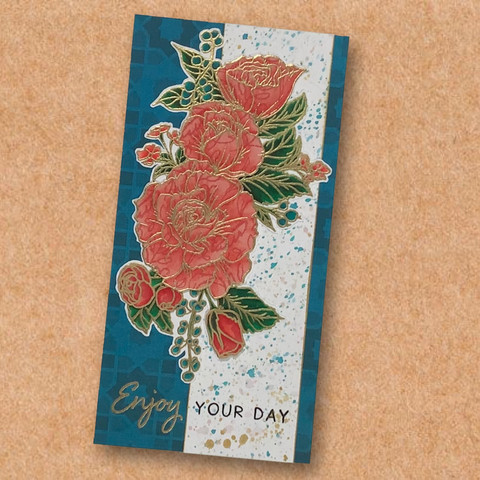
I used a teal patterned paper as the main card panel. I trimmed one panel to an A2 size and another to 3 1/2" x 7". I added a splattered strip to each card front and layered the colored flower images on top of that.


For each card, I heat embossed a sentiment from the Everything Wonderful stamp set in gold detail embossing powder. For the taller card, I only heat embossed one word and stamped the rest in Versafine Clair ink where the sentiment overlapped the splattered panel.


Next, I added some gold liquid pearls to the A2 card.


To finish, I created two corresponding card bases using 110 lb. card stock and added the main panels to the front with liquid adhesive.


I love how these cards turned out!


I think they are so elegant and would be great for almost any occasion, especially Mother's Day. :)


ree

You can find more creations from me and the rest of the Thoughtful Studio design team on Instagram and Facebook @thoughtfulstudio, as well as following the hashtags #madewiththoughtful and #thoughtfulstudioDT .


And of course, you can get these wonderful patterned papers here: https://www.etsy.com/shop/shopthoughtfulstudio


Currently, there is also a shopwide sale for 60% off until May 4, 2020!

ree

Thank you so much for stopping by!


-Jenni :)


Supplies


Stamps:


Brushmarkers:


Ink:


  • Writer: Jenni
    Jenni
  • Apr 21, 2020
  • 3 min read

ree

When it comes to masculine cards, I seem to step outside of my normal style and turn to the vintage/grunge look (Thank goodness for Tim Holtz!) and this card was no different. 😄


I made this card for my dad's birthday. He loves trains and has recently really gotten into his model train setup, so I thought this theme would be perfect.


I started by stamping out the tickets and train images from the Tim Holtz Stamper's Anonymous set On the Railroad. I used Gina K. black amalgam ink and 80 lb. Neenah card stock.


I fussy cut around the tickets and left white space around the train. I used my blending brushes and distress inks to make the images look old and like they've really been through somebody's pockets. For the train image, I did a lot of distressing: I crinkled the paper, ripped up the edges, tore off a corner, sprayed it with water, etc.


For the tickets, I wanted them to have a yellowish-green hue so I used a mix of shabby shutters, old paper, and a little stormy sky, with tea dye on the edges. I added old paper on the other ticket to make it a little more green and sprayed them both with my distress sprayer.


To finish the train image, I used almost all the brown distress inks starting with the lightest in the middle (antique linen) and the darkest along the edges (ground espresso). I turned the paper over and rubbed it into the remaining ink on my glass mat for some extra texture.


I used a map from a 4 1/2" x 6 1/2" Paper Studio paper pad called Uncharted. The postage card came from a sticker sheet in a Carta Bella kit called Old World Travel, which I don't think is available anymore. I added more of the same distress ink colors to the edges of these as well.


In my head, I was picturing an old, worn passport wallet with all these elements spilling out. So I used kraft card stock to make a pocket across the front of an A2 card. I cut down the kraft card stock to 5 1/2" x 4 1/4" and scored it a 1/4" in from each of the long sides. I used a bone folder to reinforce the folds and added double sided tape to each side and along the bottom.


I used an X-acto knife to cut two slits into the front of the pocket piece and started to arrange the distressed pieces. I used the Tim Holtz tiny attacher to staple the tickets and post card together. I also folded up the map so that it fit into one of the slits. I inked the areas where the back of the map showed with walnut stain distress ink.


Before I attached the pocket to a card base, I added distress ink to the edges and across the front and smooshed it into the left over ink on the glass mat. I also stamped the train tracks from the stamp set along the bottom of the pocket.


I slipped the pieces into the slits and used glue dots to secure them. At first I thought I would center the pocket leaving white space on each side, but I ended up positioning it all the way to the left of the card front. I removed the release paper from the double sided tape and attached it to an A2 card base.


ree

I trimmed off the 1/2" of white space from the front of the card and added a strip of card stock from the same Carta Bella kit to the inside of the card in its place. Then I added the train image to the pocket.


I used a paper doll that seemed to fit the theme and popped him up a tiny bit with glue dots onto the very front of the pocket. I used more of the stickers from the kit and staggered them alongside the paper doll.


ree

I always love playing with this style, even though I only seem to do so for a masculine card LOL! I think it gives me the opportunity to get a little messy and step outside of my clean and simple style, which I find hard to do.


I think it turned out so cool and when the card is closed, it just looks like a stack of old papers and maps. The paper dolls are so fun too, I'm going to have to do more projects with them.


ree

Thanks so much for stopping by!


Wishing you a lovely day,


-Jenni :)


Supplies


Paper:


Paper Dolls:


Stamps:


  • Writer: Jenni
    Jenni
  • Apr 19, 2020
  • 2 min read

ree

Hello,


Today I am sharing my DT project for the next My Inkie Fingers Challenge. This challenge is all about Teal and Pink!


ree

I decided to create a soft and sweet "Thinking of You" card with some cute little gnomes.


To start, I purchased a cut file from Lori Whitlock's shop to create the gnomes. I used my Cricut to cut them from some 80 lb. white Neenah card stock. I used the main gnome shape as a base to layer to add additional pieces on top.


I colored the noses with Copic markers in the colors:

  • E50

  • E51

  • E21


To give some dimension to their little beards, I ink blended along the edges with a little bit of scattered straw distress oxide ink.


For the rest of the pieces, I used a digital paper collection from Thoughtful Studio called Drizzles at Dawn with Tessa. I printed out several different patterns and cut each of the remaining pieces from the different patterns.


Sticking with the color scheme, I grabbed some more distress oxides in the colors tattered rose, spun sugar, tumbled glass, and peacock feathers. I ink blended along the edges of all of the different elements and pieced them together on the white gnome bases. I glued everything down with Tombow Mono liquid glue and popped up the noses the tiniest bit with glue dots.


For the sentiment, I used the Thinking of You wafer die from Simon Says Stamp. Before I cut it out, I ink blended the same distress oxide colors onto a piece of Neenah card stock from pink to teal.


Then I dried the ink with my heat gun for a few seconds and ran the die through my BigKick.


ree

Once all of the pieces were complete, I went on to making the background for the main panel. I used another piece of the Neenah card stock, trimmed down to 3 5/8" x 7" and splattered more of the distress oxides across it. I topped it off with glimmer mist for some extra sparkle.

ree

I used some more of the Drizzles at Dawn paper to layer onto the front of the card. I cut a piece to 3 7/8" x 7" and the main panel piece to 5'" x 7".


I layered everything up and glued it down with more liquid adhesive. I used 110 lb. white card stock for the base and added the card front.


Currently, this card is on it's way to my grandma. ❤


ree

If you'd like to enter into the current challenge, check out My Inkie Fingers' blog post to see how you can participate. 😄


My Inkie Fingers Blog Post:

https://myinkiefingers.blogspot.com/2020/04/mifc012-teal-pink-color-challenge.html?m=1


The challenge winner has the opportunity to receive a prize as well as a feature on the My Inkie Fingers' winners’ blog post.

The current challenge prizes include Stampin’ Up’s Lovely Lily Pad Stamp set & 6X6 Lily Impressions Designer Series Paper Sampler.


Be sure to check out the My Inkie Fingers' blog for additional Challenge Information and Guidelines to see how to play along.


If you are interested in seeing more inspiration using Card Sketch #12, be sure to follow the hashtag #MIFC012 on social media.


I can’t wait to see what you create! I hope you have a nice and safe week.


Thank you so much for stopping by,


-Jenni :)


Supplies


Paper:

*Use code THOUGHTFULSTUDIODT for 15% off


Die:


Follow Me
  • Black Twitter Icon
  • Black Facebook Icon
  • Black Instagram Icon
  • Black Pinterest Icon
  • Black YouTube Icon
Meet Jenni
I Love bright colors, cute critters and creating fun handmade projects.

© 2023 by DO IT YOURSELF. Proudly created with Wix.com

bottom of page