top of page
Search
  • Writer: Jenni
    Jenni
  • Sep 23, 2019
  • 2 min read

Updated: Sep 24, 2019


ree

Halloween creations are officially underway! 😃👻 This card was so fun to make, especially since the stamps weren't made as a specifically Halloween set. I was inspired to make this card as part of Hello Bluebird's Instagram challenge #hellobluebirdspookynight.


To start this card, I gathered all the Hello Bluebird stamps I have, which is very limited...so far! 😂 So with the Bee Happy and Typed Everyday Sentiments sets, I thought the only spooky twist I could put on it was a Zombee.


I stamped out the bees and the honey jar onto some 110 lb. Recollections card stock with Gina K's black amalgam ink. Before stamping, I wiped away a bit of the ink in a few places that way Zombify them later.


After stamping, I colored all the images with a mix of copic markers and Blick studio brush markers.


Once colored, I added in some tears and cracks to the little guys, as well as some creepy staring eyes using a micron pen and a white signo gel pen. Then I fussy cut the images and went around the edges with a Memento tuxedo black marker. I also cut off the antennas because they were too finicky to cut around, but I will add them back in later. Look how cute they are without them though...

ree

On to the background, I used an A2 sized piece of bristol card stock and my distress inks. I basically use Kristina Werner's combinations as a reference almost every time I use my Distress Inks. This time I chose crushed olive, forest moss, and chipped sapphire.


ree

I chose regular distress inks this time because I wanted a really vibrant background. I blended the ink with my Amazon makeup brushes and then used one of the sponge tools as well to apply a heavier amount of the chipped sapphire.


I used my distress sprayer to get some large drips across the background and then sprayed it again for some smaller spots.


For the sentiment, I used Charlie's Alpha die set and cut out the word ZOMBEE from white 110 lb. card stock. Using the smaller makeup brushes and the same colors as the background, I inked up the letters. I added some black soot to the bottoms and used the bristles of the brush to lightly dab on some speckles as well.


The rest of the sentiment is made up of the "sending hugs" phrase from the Everyday Typed Sentiments set. I heat embossed it onto some 110 lb. black card stock with white detail embossing powder. Then I trimmed it down pretty tiny and cut the words apart.


With the Spooky Scene die, I cut out the last pieces of the card from 110 lb. black card stock.


Before assembling the whole thing, I took some twisted citron and crushed olive distress oxides to add a creepy glow to the edges of the trees and ground in the scene.


I then started to put the card together by popping up the out frame onto the distressed background using foam tape. then I added in all the other pieces using a Zig glue pen. The final bee was also popped up on some foam tape.


Once together, I added the whole panel to a white 110 lb. A2 sized card base.


ree

Thanks so much for stopping by!


And bee-ware of Zombees!


-Jenni :)


  • Writer: Jenni
    Jenni
  • Sep 9, 2019
  • 3 min read

ree

Hello!


I am so so ready to start making Halloween cards 🍁🎃🍂, but before I do, I had to play with this adorable stamp set from Heffy Doodle. Once I seen this set, I knew I had to have it. It just called for lots of sparkles!! ✨


At first I thought about making a wedding card, but once I started to color, it was so cute, I knew I wanted to make a general any day card.


To start, I stamped out all the images from the set Happily Ever Crafter by Heffy Doodle. I used a MISTI to stamp the images onto some Bristol smooth card stock with Gina K. amalgam ink.


I used Marvy Le Plume II brush markers to color the images. I picked out several colors and scribbled them onto my glass mat, then spritzed them with a small amount of water using my distress sprayer. I used a #12 round brush from Hobby Lobby to pick up the colors from the mat and apply them to the images.


I started painting the areas that would be in shadow and pulled out the color into the lighter areas. I added several layers to get a nice contrast.


ree

For the gold accents, I used a Uni-Ball metallic gold gel pen. I also used the same gel pen in white for the reflections across the carriage window. In order to not make them too stark, I tapped my finger on the white marks before they were fully dry and went over them with a barely damp paint brush.


Once everything was colored, I started to put together my sentiment. The stamp set includes the word ’magical’ but I thought a die cut would stand out a little more. So I pulled a ‘Magical’ word die from Hello Bluebird, from my stash. I cut it out from the same Bristol smooth paper and painted it with a coordinating blue Marvy marker color.


I used a Spectrum Noir sparkle pen and covered the whole die cut as well as the princess’ dress and the tops of the turrets on the castle.


For the rest of the sentiment, I prepped a strip of black 110 lb. card stock with my powder tool and stamped ‘wishing’, ‘you a’, and ‘day‘ with Versamark ink.


Then I added Recollection’s white detail embossing powder to the words. With my heat tool, I melted the embossing powder and wiped off any excess powder with a Swiffer duster. I cut the words apart into three separate pieces to assemble around the ‘Magical’ die cut.


Next, I used the largest of Lawn Fawn’s stitched scalloped square frames to cut out the card front. First, I cut out the square from white card stock and then again out of gold mirror card stock. I took the inside square of white and die cut that again, but this time with Lil Inker Design‘s quilted stitch spirals die.


I took the spiral embossed square and placed it inside the gold frame. I really wanted to include most of the images without it being too busy, so I started to play with the layout the card.


ree

I really liked the wonky look of the layout above, but the die cut kind of got lost in the castle. So I adjusted the images to be straighter and tilted the die cut.


To finish the card, I made a square card base slightly smaller than the scalloped frame out of 110 lb. white card stock. Then I attached the card front to the base using Tombow Mono liquid glue.


ree

Thanks so much for stopping by!


I hope your day is full of sparkles 😄


-Jenni


  • Writer: Jenni
    Jenni
  • Sep 7, 2019
  • 3 min read

Updated: Sep 17, 2019

The end of summer is approaching very quickly and the weather is already starting to cool down. Now this sounds fantastic to me, as fall is my absolute favorite, but maybe not so much to others. For many, this means back to school and the end of vacation. I was inspired to make this Hello card saying a goodbye to summer, as a reminder of warmer days during the winter to come.

ree


To start, I cut down a piece of bristol smooth card stock slightly larger than A2 size; my goal was to make a sunset background. To do this, I used a distress oxide color combination from Kristina Werner made up of Scattered Straw, Abandoned Coral, and Dusty Concord.


ree
Oxide Combo 2

With those colors and my Amazon makeup brushes, I blended until I got a smooth look. I went over each of the colors several times, especially where the different colors met, to get a nice even gradient. Once I finished blending, I set the panel aside to dry.


For the next step, I got a piece of 110 lb. Recollections card stock and cut it down to 4.25" x 5.5". Using some glimmer mist in a mini mister, I sprayed down the card stock and dried it with my heat tool. I set that aside as well and moved onto the inside of the card.


First, I made an A2 white cardbase out of 110 lb. Recollections card stock. I wanted to have an extra surprise inside, so I decided to add a pop up element. I used some of my precolored Lawn Fawn images from the sets Life is Good and On the Beach.


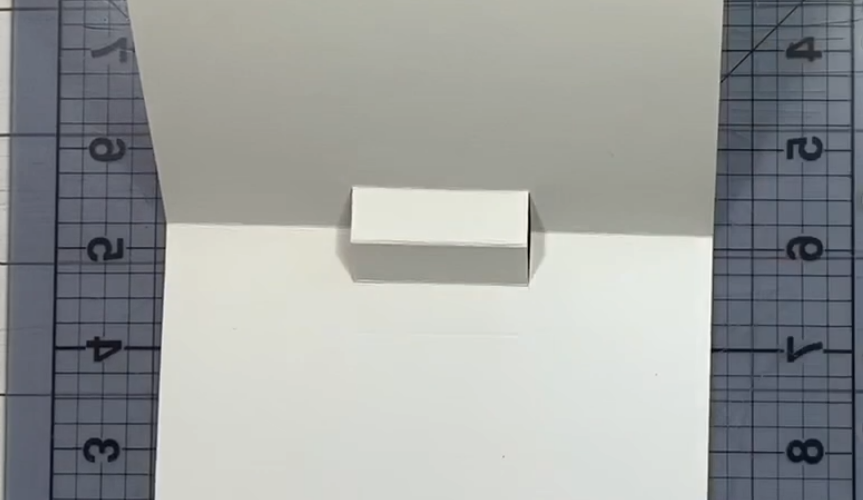
With the card folded in half, I measured out the middle of the card on the 5.5" side and marked it with a pencil. Then I also made a mark on each side of that mark about 3/4" away. With an X-acto knife, I cut a slit about 1/2" long at the marks on each side of the middle mark.


Once the cuts were made, I opened up the card base with the back facing up and used a bone folder to make some embossed lines. Then I turned it back over, folded in the pop up element, and used the bone folder again to solidify the creases. The photo slideshow above shows these steps.


I then arranged my images into a little scene and glued them down. I used mini glue dots and Tombow mono liquid glue to keep them in place. The final step for the pop up was to cover the opening on the outside, which I did by just gluing a scrap piece of white cardstock over it.


Back to the card front, I cut out Lawn Fawn's Tropical Backdrop die from the black shimmer cardstock and glued it onto the distress oxide sunset. I trimmed down the overhang and added the word Aloha using Waffle Flower's Cutaway Alpha die set and black cardstock.


I lined the letters up against the curve of the background and glued them down with a Zig glue pen. Finally, I added some birds from the Life is Good stamp set with Versafine ink and attached the panel to the card.


ree

And with that, I'd like to say Goodbye Summer and Hello Fall!! :)


GIVEAWAY!!

(Closed)


Hello everyone!


For this giveaway, you can just follow the link, which will lead you to a Rafflecopter widget, where you can follow the prompts to enter to win one of the two giveaway packages. :)


ree

*A closer look at the items can be seen in the YouTube video for this card.


Thanks so much for stopping by!


-Jenni


Follow Me
  • Black Twitter Icon
  • Black Facebook Icon
  • Black Instagram Icon
  • Black Pinterest Icon
  • Black YouTube Icon
Meet Jenni
I Love bright colors, cute critters and creating fun handmade projects.

© 2023 by DO IT YOURSELF. Proudly created with Wix.com

bottom of page