- Jenni

- Jul 21, 2020
- 4 min read

Hello!
About a week ago, in the Thoughtfully group on Facebook, I shared my very first watch party! 😄 It was part of the Red, White and Blue event held in the group, where crafters came together to share projects using different Thoughtful Studio paper kits. During my video, I created some mystical paper projects using the Emerald Tessa paper kit.
The group is full of crafty inspiration, conversation, and even some freebies! Feel free to stop on over, we have a lot of fun! There will definitely be more lives and tutorials in the future as well.
So, with a bunch of fun supplies and a lot of hot glue, I put together two paper wands and two paper bows. I also came up with a tagline that many crafters might relate to: "Fixing mistakes with fake flowers!" Haha! I feel like this could be a book title, Fixing mistakes with fake flowers: A Crafter's Guide. 😅
Anyway 😂...
To start, I used a bow tutorial from putsomeblingonit on Youtube, to create a bow without dies. She actually used oval dies to create her bows, but I didn't have those either, so I made up a simple cut file for my Cricut with all the components. I picked two different Emerald Tessa patterns and cut the pieces from each to make two bows.
Each side of the bow is made up of three ovals in varying sizes, which are folded in half and hot glued at the smallest end. From there, all six ovals are glued onto a 2" x 3/8" strip from largest to smallest towards the middle, leaving about 1/4" gap in the center.
In the middle, I added a piece of foam tape and then wrapped my other strip of card stock around it and secured it in the back.
On one of my bows, I added my tails coming out from the sides and on the other, I had them coming down from the middle. I just attached them to the back with another drop of hot glue.
As a final step, I used some floral elements and gold card stock to embellish the bows.

*Be sure to pop in to the Thoughtfully group if you're interested in this bow cutfile.
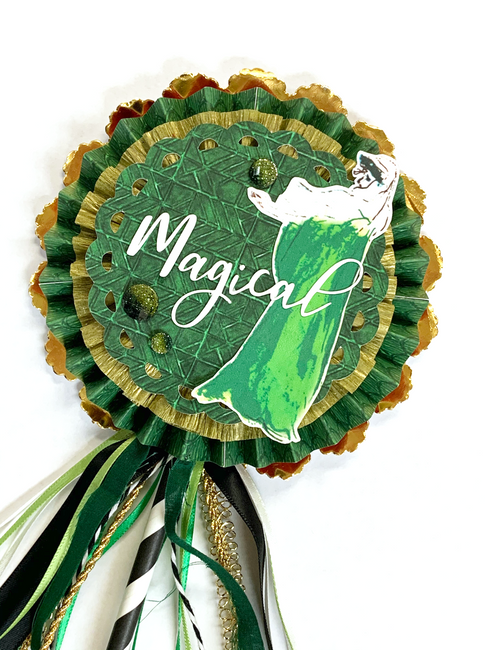
For my wands, I drew color inspiration from the Emerald Tessa card stock and added gold and black elements.
I started from the bottom/back of the wand with a 4 1/2" circle cut from 110 lb. card stock. On top of that, I added a gold foil doily that was slightly bigger than my circle.
For the next layer, I created a rosette using the ET card stock followed by a gold, crepe paper rosette. I made the first rosette using a scoreboard and scored four 2" x 8 1/2" strips every 1/2" from one end to the other. I attached the four pieces in a circle and added hot glue to the center. For my second rosette, I used a paper crimper, and ran four more strips through it, finishing that rosette the same way.
The very top layer was made up of a scalloped circle I had also cut using my Cricut. I embellished the wands with bits of ephemera from the kit and sparkly enamel dots. I cut out the words 'Dreamer' and 'Magical' and glued one onto each wand.
Once the tops of my wands were complete, I moved onto the trim. I gathered a bunch of different trims from my collection including baker's twine, ribbon, and beads. I used the paper straw, that would make up the handle of the wand, as a guide for how long to make the trim. I laid everything out and made my cut just past the length of the straw. I used a piece of thread to hold everything together at the center.
Before gluing everything together, I added a lollipop stick inside the straws to create some extra strength and added a drop of hot glue at each end. You could also cut down the length of another straw and fit it inside the first straw to make it stronger, which I've also done.
To add the trim and straw handle, I look for the center most opening in the paper rosette. Then I add a decent amount of hot glue and push the trim into the opening with the straw, at the center where I tied the thread. I add more glue, if needed, to hold everything in place.
This is where my tagline comes in! 😅
When I made my second rosette with the paper crimper, I didn't take into account that the score marks were only 1/4" apart. So when I went to add the trim and straw to the wand, I had to force it into the space. To cover where the paper bulged out, I hot glued on some daisies! And voilà!


These were so fun to make! 💚

If you're interested in purchasing this kit for yourself, you can click this link to head to the thoughtfulcollective shop.
And of course, you can find other Thoughtful digital paper collections here: https://www.etsy.com/shop/shopthoughtfulstudio
You can also use coupon code THOUGHTFULJENNI for 15% off on the ShopThoughtfulStudio Etsy shop!
You can find more creations from me and the rest of the Thoughtful Story Team on Instagram and Facebook @thoughtfulstudio, as well as following the hashtags #madewiththoughtful and #thoughtfulstoryteam .
Thank you so much for stopping by!
-Jenni :)
Supplies
Embellishments:
Trims:
1/8" Satin Ribbon: https://www.joann.com/offray-double-faced-satin-ribbon-1%2F8in-x-12-feet/zprd_16031445a.html
5/8" Satin Ribbon: https://www.dollartree.com/floral-garden-satin-ribbon-6yd-spools/964641
Gold Looped Edge Trim: https://www.hobbylobby.com/Fabric-Sewing/Ribbons-Trim/Trims/Metallic-Gold-Looped-Edge-Trim---3-8%22/p/102350
Baker's Twine: https://www.hobbylobby.com/Fabric-Sewing/Ribbons-Trim/Trims/Black-Baker's-Twine-Trim---1-16%22/p/116398
Cardstock:
Paper Crimper: